This site uses tracking information. Visit our privacy policy. Click to agree to this policy and not see this again.

Ophthalmology and Visual Sciences

Ocular Ultrasound: A Quick Reference Guide for the On-Call Physician

Ocular Ultrasound: A Quick Reference Guide for the On-Call Physician

Contributors: Aaron Fairbanks BS, Lorraine Myers (Provencher) MD, William Flanary MD, Laura Warner, H. Culver Boldt MD

The University of Iowa
Department of Ophthalmology and Visual Sciences

February 4, 2016


Ocular ultrasound, also known as ocular echography, "echo," or a B-scan, is a quick, non-invasive test routinely used in clinical practice to assess the structural integrity and pathology of the eye. It can provide additional information not readily obtained by direct visualization of ocular tissues, and it is particularly useful in patients with pathology that prevents or obscures ophthalmoscopy (e.g., large corneal opacities, dense cataracts, or vitreous hemorrhage) (1).

Some academic centers employ a highly trained ocular ultrasonographer to perform ocular ultrasound during regular business hours. Consequently, ophthalmology residents may lack technical and practical experience in ocular ultrasound. These deficiencies are highlighted when seeing patients after hours, while on-call. Proficiency in performing ocular ultrasound is an invaluable tool to the on-call physician who seeks to quickly, safely, and inexpensively examine the globe and properly triage a patient. Please note, in the setting of a suspected open globe injury, echography should only be performed by an experienced echographer, as pressure on the eye can cause further damage. Here, we present a simple, introductory "on-call survival guide" for ophthalmology residents using ocular ultrasound.

Ocular Ultrasound Technique

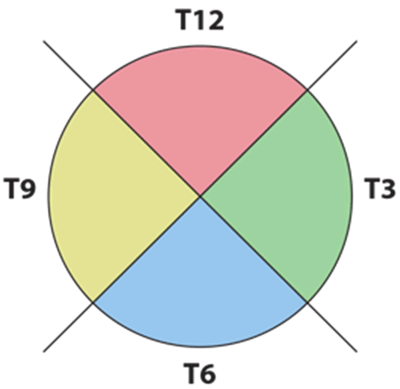
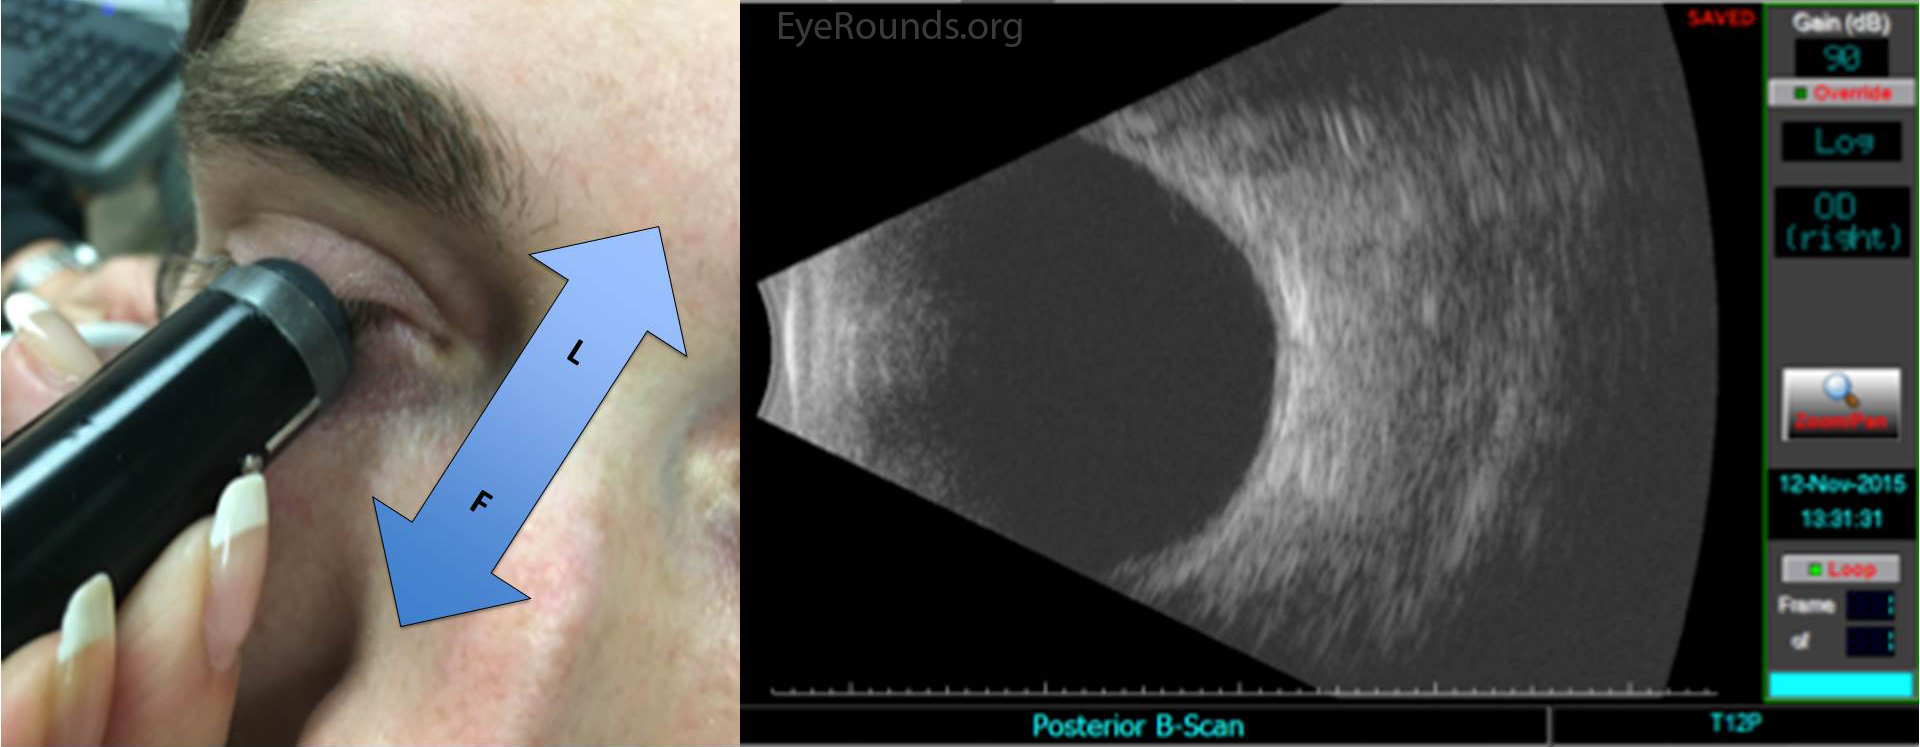
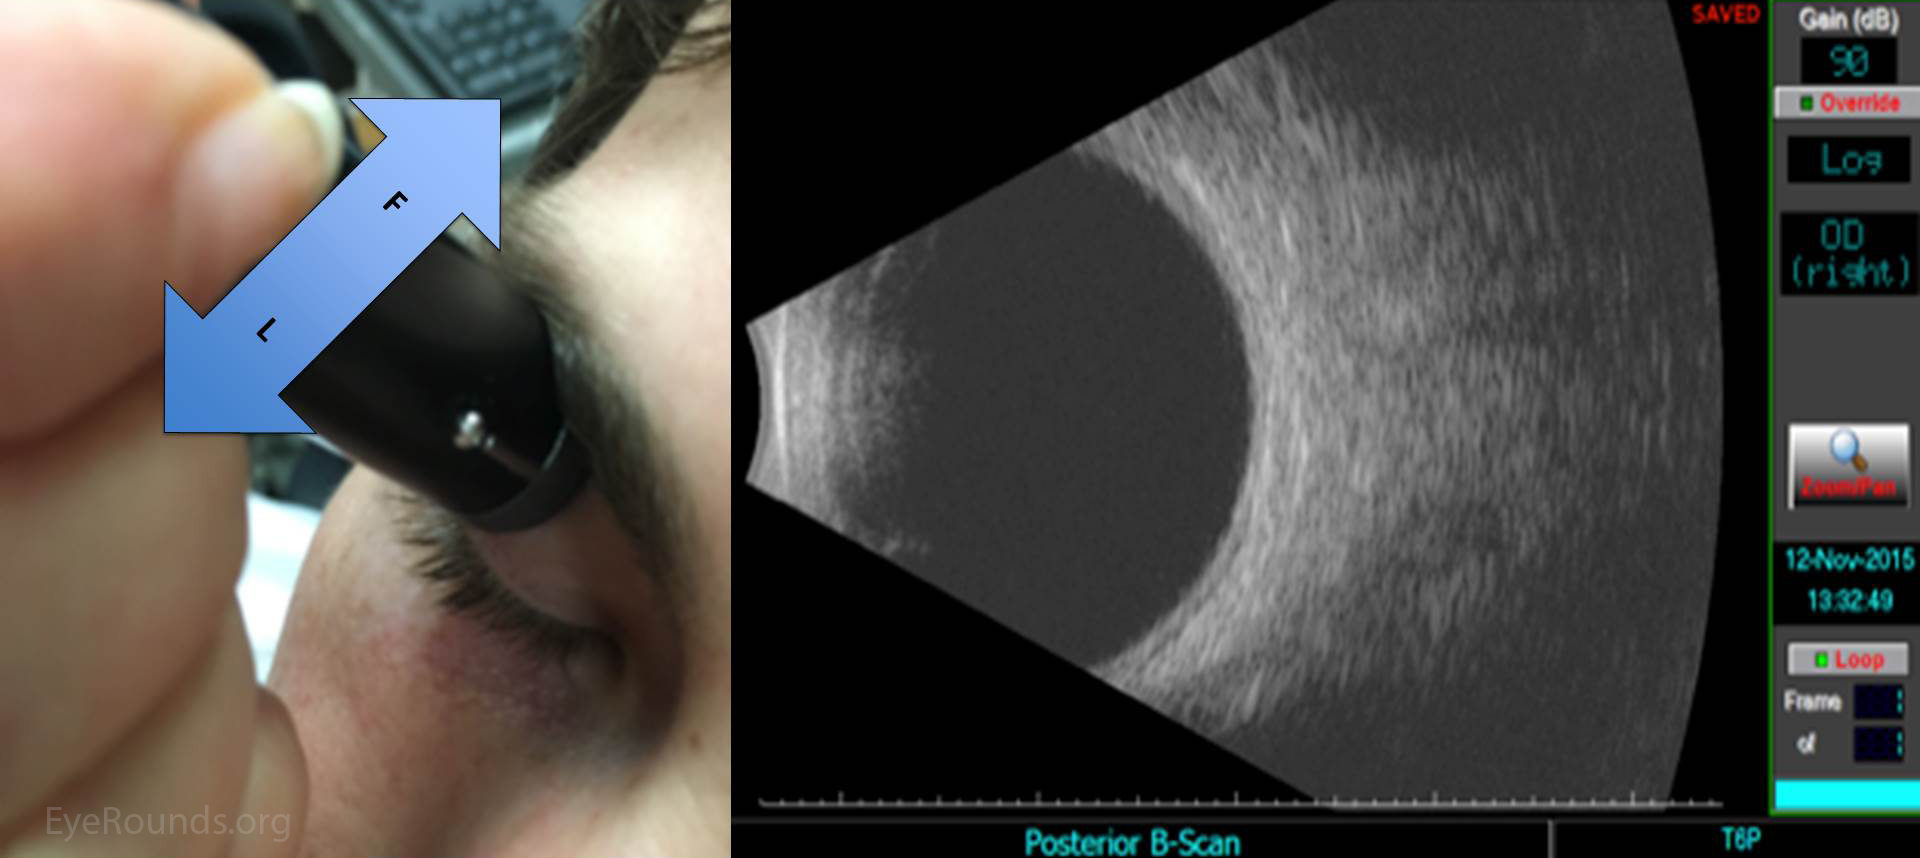
One can examine the entire globe in just five maneuvers, i.e. four dynamic quadrant views and one more static slice through the macula and optic disc, also known as longitudinal macula (LMAC). The quadrants views are designated T12, T3, T6, and T9. These numbered quadrants correspond to a clock face superimposed on the eye. For example, T12 is a view through the superior quadrant of the eye, T3 the nasal quadrant of the right eye (temporal quadrant of the left eye), and so on (Figure 1) (2).

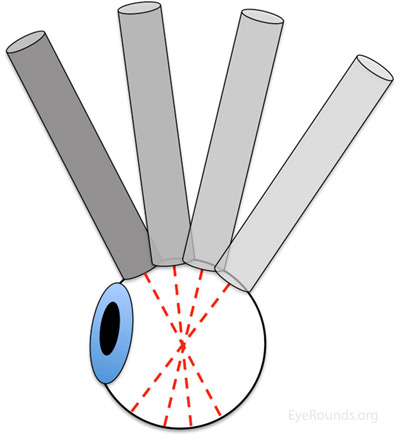
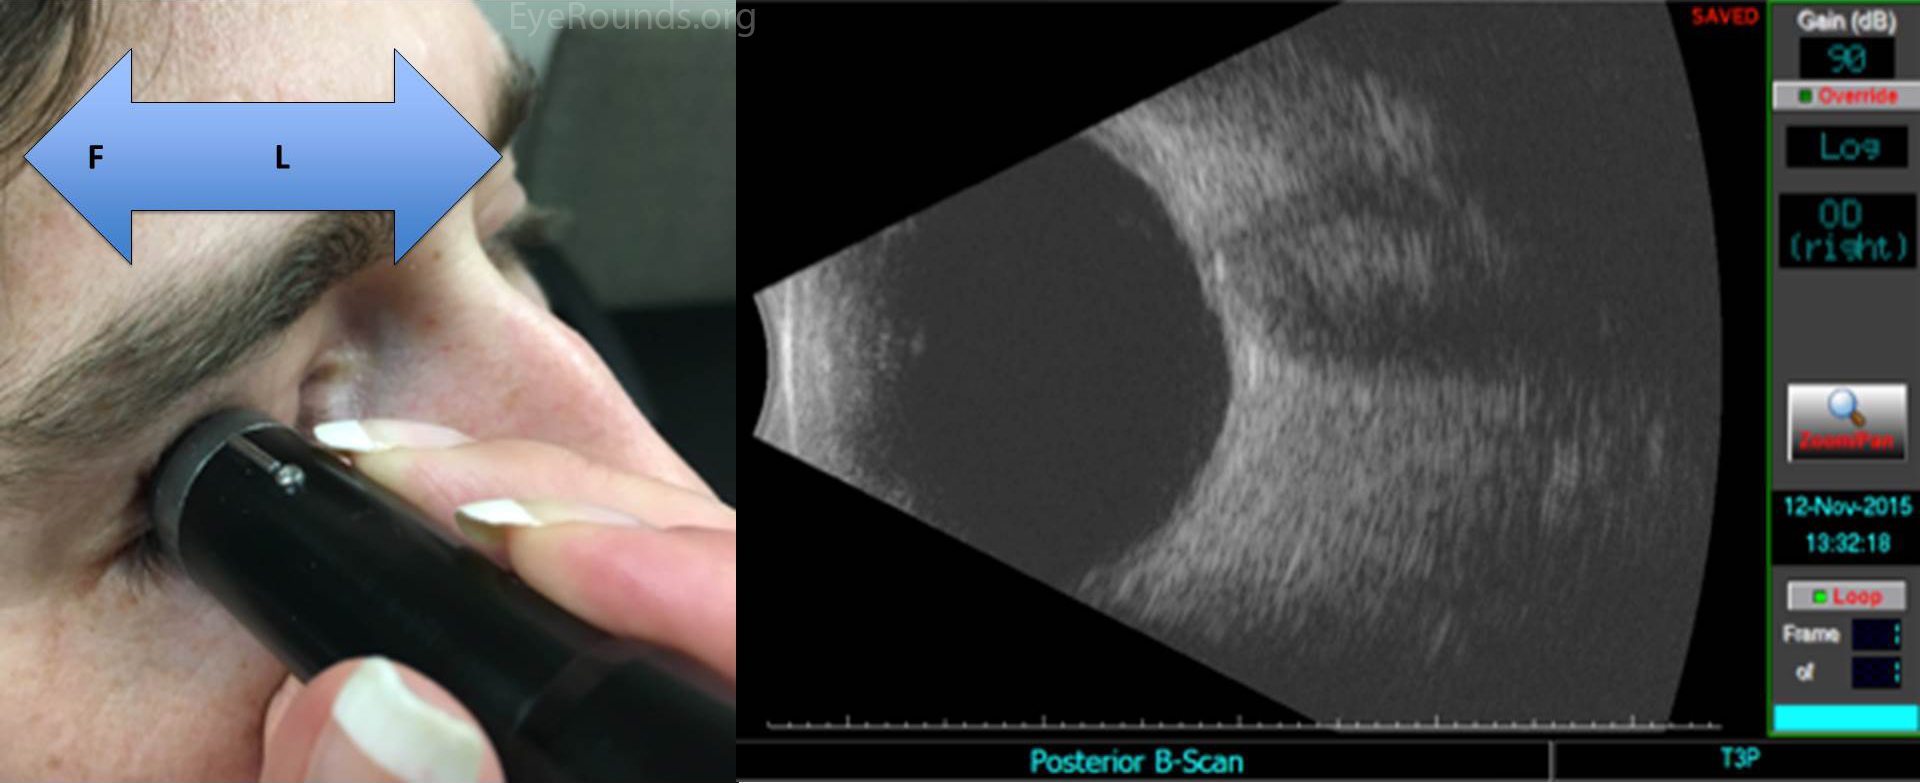
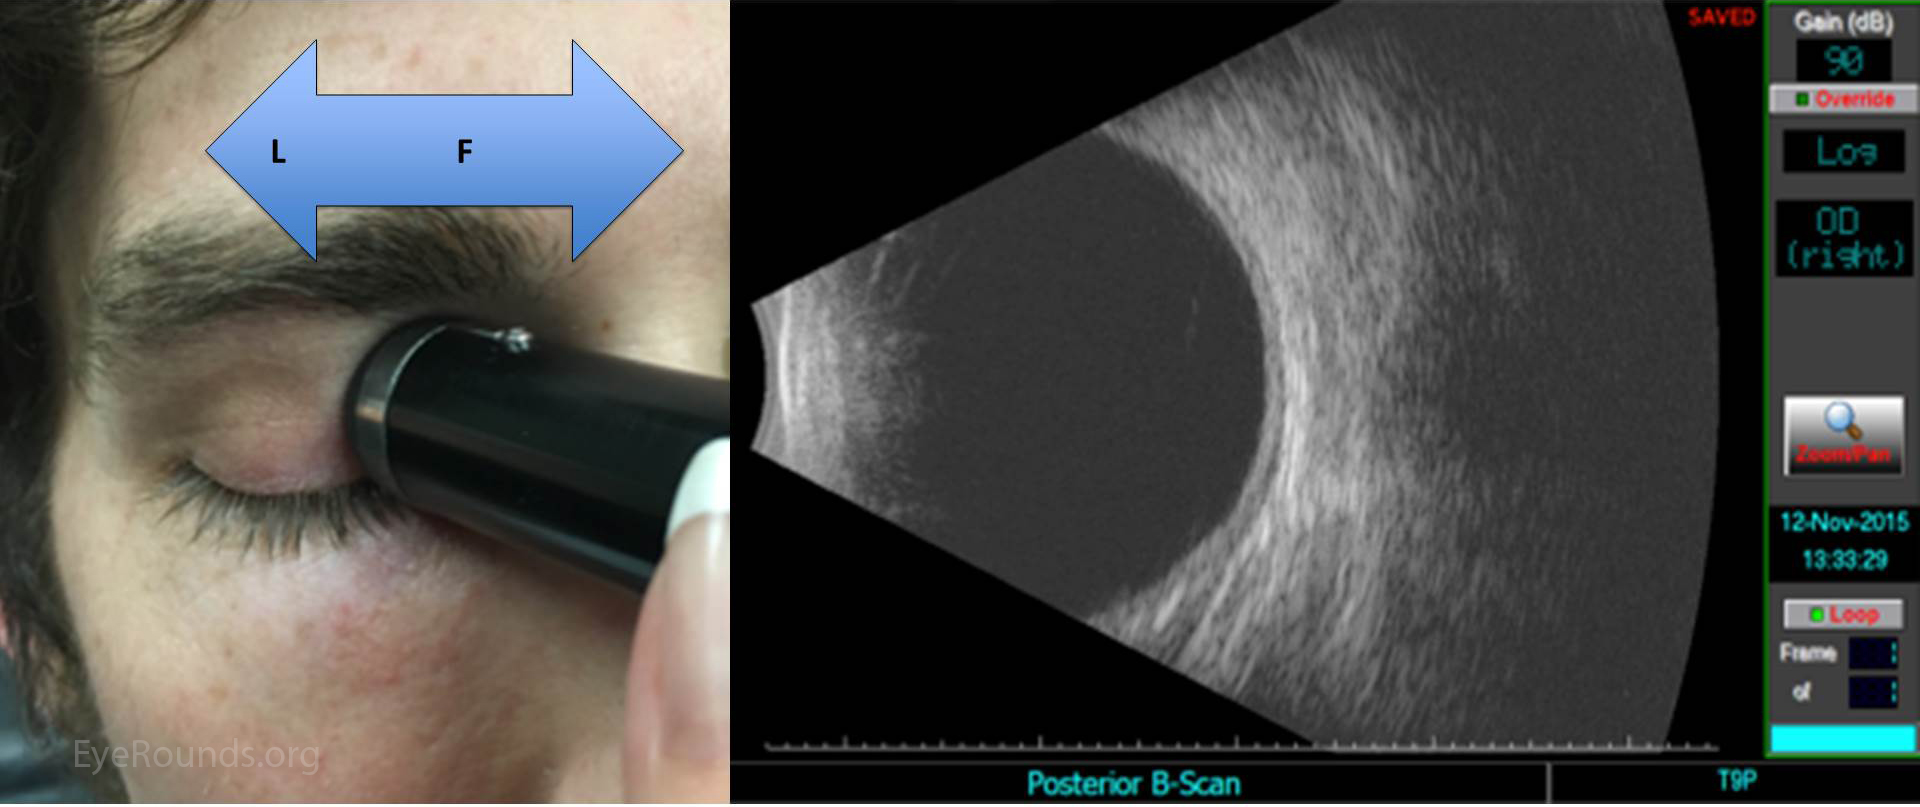
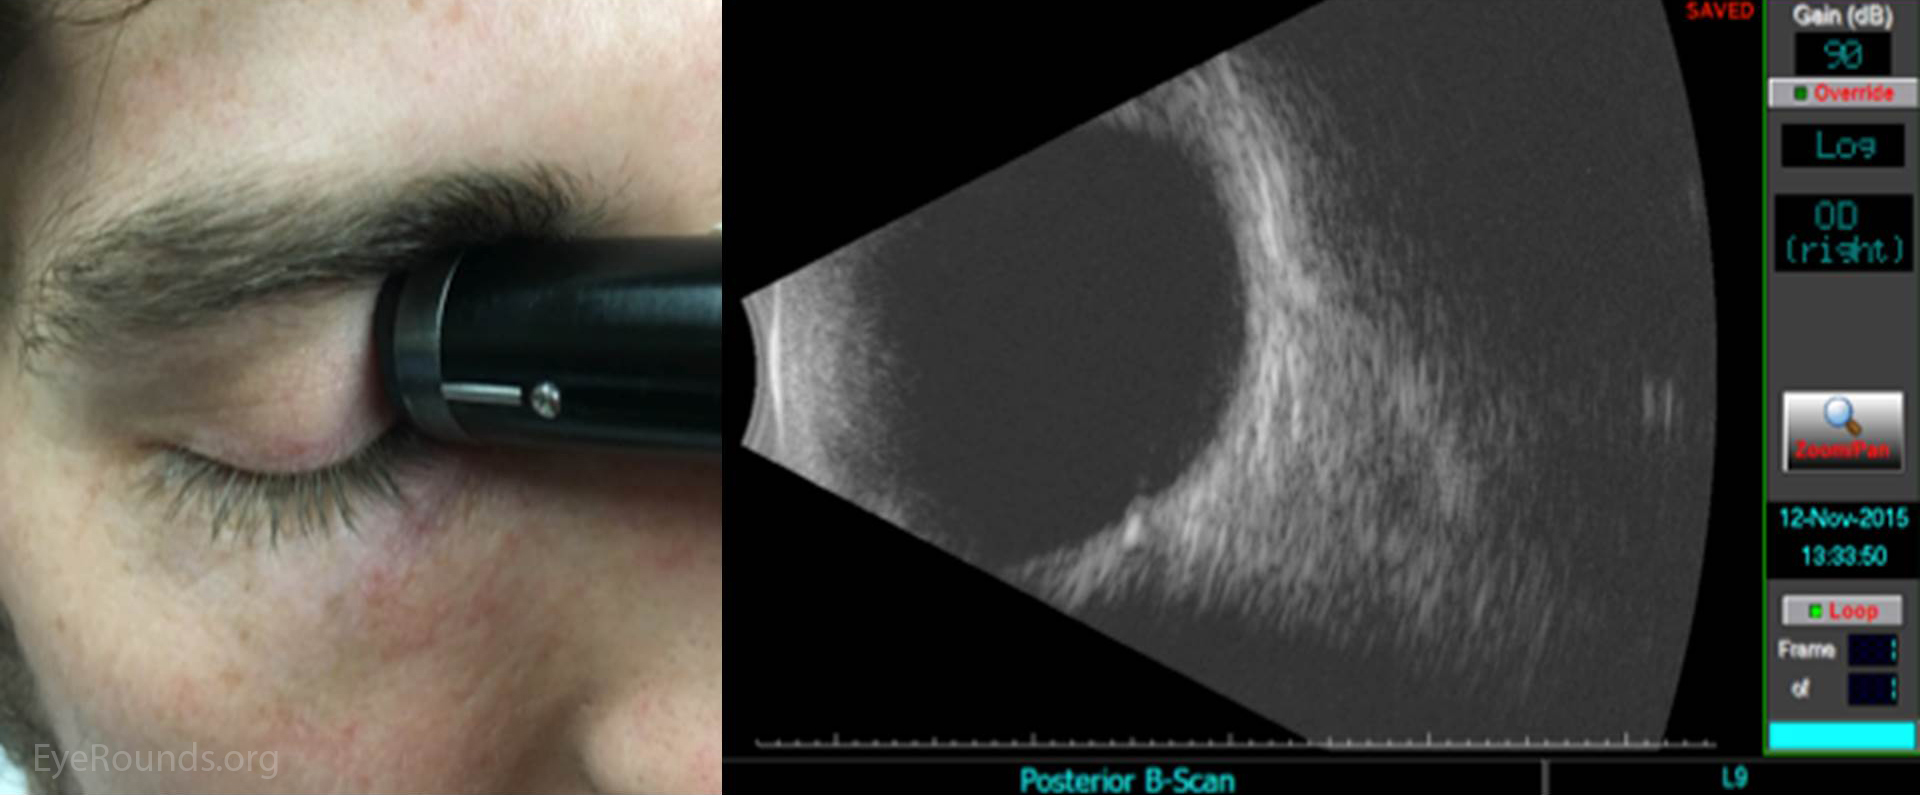
Ultrasound images can be obtained through the patient's eyelids (as depicted in this tutorial) or with the probe directly on the surface of the eye with appropriate topical anesthesia. Begin with the gain on high. The patient should look in the direction of the quadrant to be evaluated. The marker on the probe is always oriented superiorly or nasally by convention. Use a limbus-to-fornix rocking, rotational motion so that the tip of the probe moves a small distance, while the base of the probe moves a larger distance (Figure 2) (3). The probe rotates around the globe so that the sound waves always pass through the center of the eye. This rotational motion will maximize the amount of retina visualized during the scan. See the "Additional Information" section for more detail.

Schematic of ultrasound quadrants
Figure 1: Schematic of ultrasound quadrants
diagram Limbus-to-fornix rotational motion
Figure 2: Limbus-to-fornix rotational motion

A Step-Wise Approach

Transverse View 1: T12 (quadrant centered at 12 o'clock)

Figure 3: Ask the patient to look up. Place your probe on the inferior aspect of the globe with the marker oriented nasally. Begin at the limbus (L) and locate the optic nerve shadow, both to orient yourself and assure you are imaging the posterior segment. Slowly sweep your probe toward the inferior fornix (F) until visualization of the T12 quadrant is complete. Repeat if necessary. Remember to center any pathology along the equatorial plane of the image for the best resolution.

Transverse View 2: T6 (quadrant centered at 6 o'clock)

Figure 4: Ask the patient to look down. Place your probe on the superior aspect of the globe with the marker aimed nasally. Again, begin at the limbus (L)). Ensure you have an image of the retina and optic nerve before sweeping the probe toward the superior fornix (F). Repeat if necessary, centering any pathology.

Transverse View 3: T3 (quadrant centered at 3 o'clock)

Figure 5: Remember, to scan the medial and lateral quadrants of the eye, the probe marker should point superiorly. For the T3 quadrant of the patient's right eye, instruct the patient to look left. Place the probe on the temporal limbus (L). After obtaining an image of the retina and optic nerve, gently sweep the probe to the fornix (F) to complete evaluation of this quadrant. To view the T3 quadrant of the left eye, the patient should still gaze to the left, but the probe will be placed at the medial limbus, with the marker oriented superiorly.

Transverse View 4: T9 View (quadrant centered at 9 o'clock)

Figure 6: Scanning the T9 quadrant of the right eye is simply the reverse scan of the T3 quadrant. With the probe marker oriented superiorly, instruct the patient to direct their gaze to the right. Place the probe on the globe at the nasal limbus (L). For the T9 quadrant of the left eye, place the probe at the temporal limbus. Proceed, again with a limbus-to-fornix (F) rotational sweeping movement.

Longitudinal Macula (LMAC) View

Figure 7: The LMAC view allows for proper visualization of the macula and optic nerve. Gently place the probe on the nasal aspect of the eye with the patient's gaze directed temporally. Note: For this position, the marker of the probe should be directed toward the pupil, instead of superiorly. A longitudinal scan is the only scan where this occurs! In this view, the optic nerve will be below the macula. Maneuver the probe to bring the macula into the center of the image to obtain the best resolution.

Summary

The on-call ophthalmologist must be proficient at ocular ultrasound, as it is an indispensible tool for the diagnosis and triage of ophthalmic emergencies. One can systematically examine the entire globe with just five maneuvers, i.e. four dynamic quadrant views and one longitudinal cut through the macula and disc. One must always remember that this is simply a starting point, and a more detailed, comprehensive ultrasound examination should be guided by additional clinical data and preliminary ultrasonographic findings.


Appendix: Supplemental information on ocular ultrasonography (2)

  1. High frequencies (approximately 10Mhz) are used in ocular echography because they produce an image with greater resolution than low frequencies. While this comes at the expense of poorer tissue penetration, high frequencies retain enough penetration to properly examine the delicate ocular structures.
  2. The B-scan creates a two dimensional image from a very thin slice of tissue oriented perpendicular to the cylinder of the probe.
  3. The area of best resolution is along the center axis of the probe, parallel to the probe itself. Thus, the area of interest should be placed along the equatorial line of the image. In ocular ultrasound, the retina will appear on the right hand side of the image; this is where any pathology should be focused.
  4. The denser the tissue, the brighter (hyperechoic) it will appear and vice versa. If the tissue is dense enough, it will cast a "shadow" directly behind it, preventing that tissue from being evaluated.
  5. As the gain is adjusted higher, weaker signals are more easily visualized (vitreous opacities, posterior vitreous detachment, small foreign bodies, etc.).  As the gain is adjusted lower, stronger signals are more easily visualized (masses, tumors, etc.) and the weaker signals may be absent.
  6. For transverse images, the marker on the probe is always oriented superiorly or nasally by convention. This allows any reader to interpret your images given the stated cut (e.g. T12).
  7. The most effective method to examine the extent of the retina during a B-scan is to use the limbus-to-fornix technique. To perform this technique, the ultrasonographer should gently glide the probe from the limbus of the eye to the fornix in a sweeping motion to maximize the amount of retina visualized during the scan.
  8. By convention, a clock face is superimposed on each eye to identify the quadrants to be scanned, similar to the method used to describe fundus lesions. While the T12 and T6 remain superiorly and inferiorly (respectively) on each eye, the T3 quadrant on the patient's right eye is located nasally, while on their left it is the temporal quadrant. The same is true for the T9 quadrant, which is located temporally on the right eye and nasally on the left eye.

References

  1. Byrne SF, Green RL. Ultrasound of the eye and orbit. 2nd ed. St. Louis: Mosby Year Book; 2002.
  2. Boldt HC, Ossoinig KC, Warner LL, Fuhrmesiter L. Echography. http://www.medicine.uiowa.edu/ eye/echography. Accessed November 25th, 2015.
  3. Waldron RG. Contact B-Scan Ultrasonography. Emory Eye Center. 2003:1-9.

Suggested Citation Format

Fairbanks A, Myers (Provencher) L, Flanary W, Warner L, Boldt HC. Ocular Ultrasound: A Quick Reference Guide for the On-Call Physician. EyeRounds.org. posted February 4, 2016; Available from: http://www.EyeRounds.org/tutorials/ultrasound/


last updated: 2/4/2016